Installing Jekyll
My website is made using Jekyll, a cool open-source static website generator. I’ve used Jekyll several times over the years, which means I’ve gone through the setup process several times on various computers, and every time it’s a bit of a struggle. My advice is to take it one step at a time. Be persistent and read through the documentation as well as the information and errors listed in the Terminal as you work through the hiccups. You’ve got this!
There are several ways to get Jekyll up and running depending on your setup. This article explains the steps that worked well for me, but it’s certainly not the only way. I’ve included some links at the bottom of this article that you might find helpful if your setup is different, or you would like further clarification.
I should note that while everything installed okay and works, my computer is 10 years old and does not run the current Mac OS. While installing Jekyll I did get some warnings that my OS is no longer supported by Apple or Homebrew.
Hardware:
- 2010 11” MacBook Air
Software:
Instructions:
- Jekyll is powered by a programming language called Ruby (version 2.4.0 or higher). You can check what version of Ruby you have installed on your system by using the command
ruby -vin your terminal app. High Sierra has 2.3 installed by default so I’ll have to install a more recent version of Ruby first. This will take a few steps, the first of which is installing Xcode Command Line Toolsxcode-select --install - Install a package management app called Homebrew.
/bin/bash -c "$(curl -fsSL https://raw.githubusercontent.com/Homebrew/install/HEAD/install.sh)" - Install rbenv, an application used to manage multiple verions of Ruby.
brew install rbenv - Run
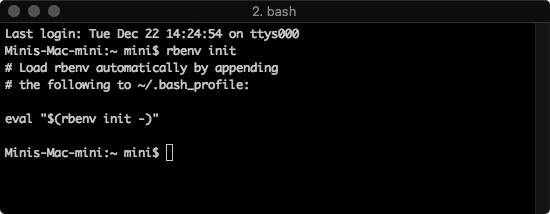
rbenv init. This will give you instructions that probably look similar to this:
This just means is that you’ll need to edit the file “.bash_profile”. You can use the nano text editor in Terminal for this by enteringnano ~/.bash_profileand then addingeval "$(rbenv init -)"at the top of the file, then press CTRL+O and return to overwrite the file. Then CTRL+X to exit the file. - Check your installation by entering
curl -fsSL https://github.com/rbenv/rbenv-installer/raw/master/bin/rbenv-doctor | bash
It’ll probably tell you there are no versions of Ruby installed, which is cool because that’s our next step. - Restart your terminal to apply changes. You’ll need to tell rbenv which version of Ruby you want to install. To see a list of recent stable versions, enter
rbenv install -l. As of the writing of this article, version 2.7.2 is the current stable version that is supported by Jekyll. To install it, enterrbenv install 2.7.2 - Next, enter
rbenv global 2.7.2to apply this version of Ruby globally. Restart you computer. - Fire up Terminal again to verify that it’s installed correctly by entering
ruby -v - Almost there! The last thing to install the Bundler and Jekyll gems. We can do this with one line with
gem install jekyll bundler - Next we’re going to make a Jekyll site. Make a folder where you want the files for your website stored locally. In Terminal, type
jekyll newa space, then drag and drop the website folder into the Terminal. It should look similar to this:jekyll new /Users/mini/new_website. - For Jekyll to take all of the markdown files and generate a static HTML website, it needs to be compiled by a server. In Terminal, you’ll need to point it from the root directory to the folder you just made. Type
cdand a space, then drag and drop the website folder into the Terminal. It should look similar to this:cd /Users/mini/new_website. Hit return, then enter the commandbundle exec jekyll serve. - In my case, I received an error saying I didn’t have all of the needed dependencies installed. I entered
bundle installto install them, then triedbundle exec jekyll serveagain and it worked. - Go to http://localhost:4000 in your browser and it should load your new website.